Creative Cocktails for the Crazy Camper

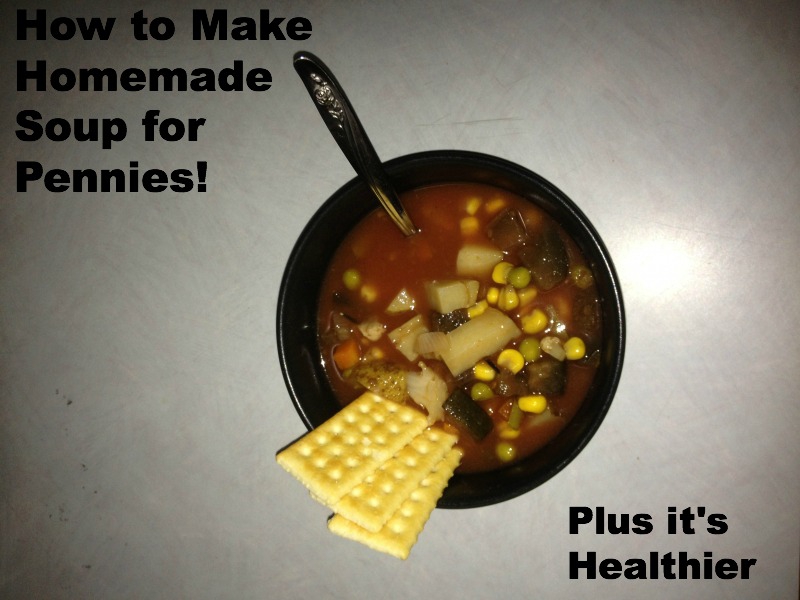
We’ve all seen the rules posted in large dark letters “Absolutely NO Glass Bottles are Permitted In the Campground.”  And I think we can all agree that this rule is enforced for very good reasons but that doesn’t mean you can’t enjoy the occasional adult beverage on a hot summer day it just means you have to be more creative about the way you serve it.  As an avid Pinterest pinner I have found two drink “recipes” that would be ideal to serve to your friends and family on those sunny, lazy afternoons.

The first one is alcoholic ice pops.  The great thing about these are that you can make them with pretty much whatever you happen to have on hand.  The idea is to use a long skinny plastic bag (I save the ones that Icee’s come in and rinse them out once my kids have eaten them) and fill them with your favorite cocktails.  It is much easier to use a funnel in this process.  I also like to add chunks of food to my adult pops.  For example my favorite is to make a typical gin and tonic but add chunks of lime to the mix.  Simply rubber band the open end of the bag and freeze! You can do this with strawberry margarita mix and add chunks of strawberry.  I’ve even seen it done with a good whiskey and adding slivers of dark chocolate throughout.  Of course with any straight alcohol you will need to add water in order to allow the mixture to freeze.  Your guests will be very impressed!

The second recipe I’d like to share with you is a margarita you can eat.  Simply cut watermelon slices into large triangles leaving the rind on so you can keep hold of it.  I then fill a baking dish half full with tequila and lay the slices of watermelon in, letting the tequila soak in.  The next step is to dip the tequila drenched watermelon into a coarse salt (or sugar depending on your preference) and voila, and edible margarita that is sure to be a conversation starter.

Morning Meals Made Easy

Maybe it is due to my intense dislike of mornings in general but waking up and cooking breakfast always seemed like a dreaded chore to me. BK (before kids) I would grab a bite of leftover pizza or just drink coffee before running off to work or to start my day. Now I realize the importance of a well rounded morning meal and have found a way around my am duties! I have started preparing and then freezing all of our breakfasts. I can easily make 2 weeks worth of breakfasts’ for my family at once with only one mess. Plus I usually like to cook at night so no more early morning squinting to read cooking directions. This is ideal for RVing too! We can squeeze in a healthy breakfast before going outside and enjoying the day without the hassle of cooking and clean-up in the morning. Here are a few of my favorite breakfast freezer recipes…..

Pancakes: (Yes you can actually freeze pancakes)

Breakfast Sandwiches and Burritos

Baked Oatmeal

Where Pizza Hut Doesn’t Go

Sitting around a campfire, parked in the middle of nowhere, roasting marshmallows and talking about the good ole days… what could possibly make this better? Pizza of course, in fact over the years I have concluded that pizza makes everything better. Unfortunately getting a pizza delivery to venture out to your campsite would be near impossible. Instead make your own in the form of a Pie Iron Pizza! All you need is:

  • pizzapieiron23Bread
  • Butter
  • Mozzarella cheese
  • Sauce
  • any topping you want (pepperoni, mushrooms, onions, etc)

To assemble simply take two slices of bread and butter one side of each. Place the slide of bread butter side down in your pie iron and top with 1 to 1 1/2 tablespoons of pizza sauce. Then add your toppings on top of the sauce and the cheese on top of those. Put the other slide of bread on top with buttered side out. Put pie iron on the fire until bread is toasted and cheese inside is melted. And there you have it, the perfect campfire pizza and you don’t even have to give a tip!

– See more at: http://www.indianarvdealership.com/where-pizza-hut-doesnt-go.blog#sthash.xpjhGKsQ.dpuf

Free Soup: A Perfect Family Meal

I can’t tell you how many times I’ve had half an onion, a couple carrots, or a handful of peas left over from dinner and not quite known what to do with them. I hate the idea of throwing out and wasting good produce (especially when it certainly doesn’t come cheap) but I also didn’t want it rotting away in my refrigerator. Well I recently stumbled upon the best solution to this problem and it will not only save you money and waste but will make a great meal as well. I simply leave a sealable tupperware container in my freezer. Anytime there is some left over diced tomatoes from taco night or a couple sticks of soupbowlpinterestcarrots getting a little flimsy in the refrigerator I cut them up and place them in my freezer container. Once I have a full container of assorted veggies in my freezer I easily dump them into our crockpot with some tomato sauce, chicken stock, and a small amounted of assorted spices. Within hours you have a homemade vegetable soup your family is sure to enjoy.

In addition to the delicious meal and eliminating unnecessary waste this little tip will save you a lot of money on a fulfilling family dinner. In my most recent trip to Target I noted that the vegetable soup I usually buy runs nearly $2.00 a can. I’m confident I spent less than that on my entire crock pot of soup if you figure the vegetables were going to be thrown away so they are essentially free. I was also shocked to see some of the ingredients in this “wholesome” veggie soup. Ingredients such as potassium chloride, calcium chloride, and others.

The best way I have found to enjoy this delicious meal is to put the soup into large freezer bags once it’s cooked. I lay them flat in the freezer so that once they are frozen they are stackable. This is a perfect freezer meal to throw in our RV freezer for a home cooked meal on the road. So I think I’ll stick to my homemade, “free” soup and leave the chemicals out!

Creating Your Own RV Spice Rack

spicerackWhile the concept of finding a new, compact, and easy way to store your spices is not new…. the fact that I actually made something handy is. This new take on a spice rack is ideal for any RV or camper and makes cooking a breeze. No longer do you have to tote all of your spice jars and take up valuable kitchen space. This handy and simple to make spice rack requires few supplies and fits neatly on your wall. All you need is test tubes with corks, a piece of stainless steel, two screws, some small magnets, and a glue gun.

Simply glue a small magnet to the back of each test tube. Find where you want to mount the metal strip and put two screws into the metal and wall. Fill your test tubes with spices and voila they stick to the strip. In addition to being useful it is also adds a bit of flair and modern design to your kitchen!


Prepping a Freshly Caught Fish

I think we can all agree that a nice day of fishing and relaxing is one of the most sought after pastimes. I also think that most of us can agree that the taste of a freshly caught pan fried fish is unforgettable. The only thing standing between us and that decadent mouth watering fish is a process that, to put it lightly, is undesirable to many. As much as I thoroughly love the outdoors this pushes the “outdoorsy” limit for me but I have managed to grin and bear it for the sake of dinner and here’s how I did it.

fishing_on_shore2Once you have caught the fish you are half way there already. The next step is removing the scales of the fish. You can do this with a dull edge of a knife or even the back of a spoon. Use short quick strokes from tail to head. The scales will go flying so it’s best to do this task outdoors. If you do it inside I would suggest submersing the fish in a basin of water and doing it underneath the water. After you are done scaling the fish you will want to make a cut from the gills to the vent. Once you have opened the cavity you will want to remove the entrails with your fingers. Make sure to check the cavity thoroughly and rinse the inside and outside of the fish.

Since we are cooking our fish whole we then remove the dorsal fin by cutting along each side of the fin where it is attached to the fish. It is easiest if you then pull the fin out with a pair of pliers. To store the fish until you are ready to prepare and cook it simply put it in a cooler with clean ice that can drain from the container as it melts. You don’t want the fish soaking in water. Also another tip is to store the fish cavity side down to prevent water from pooling inside the fish.

Stay tuned for some amazing whole fish recipes to enjoy around the campfire….

Meatless Stuffed Peppers

As a newly inspiring vegetarian I sometimes find it difficult to make meatless meals when we are camping. My go to meals used to include hot dogs, hamburgers, and chicken. But no longer I am on a mission to eliminate meat from my families life and I have found some wonderful recipes that you won’t even notice that there is no meat included. One of my favorite new dishes that is simple to do over the fire is stuffed peppers. All you need is…..meatlesstuffedpepper

  • 6 large sweet peppers
  • 2 cups cooked brown rice
  • 3 small tomatoes, chopped
  • 1 cup frozen corn, thawed
  • 1 small onion, chopped
  • 1/2 can of red beans, rinsed and drained
  • 3/4 cup of cubed monterey jack cheese
  • 3 garlic cloves minced
  • 3/4 cup meatless spaghetti sauce
  • parmesan cheese

Simply cut off the tops of the peppers and remove seeds. In a large bowl combine all ingredients and scoop back into the peppers. Sprinkle some extra cheese over the top of the peppers and reapply the pepper lids. Wrap the entire pepper in aluminum foil and place above the fire to cook. Check often to see if pepper is becoming soft. Once cooked remove and let cool.

Before we head out on an RV trip I mix up this stuffing mix and keep it frozen until ready to use! My family loves it and no one seems to miss the meat!